Creating a Property Listing Post
‘Features*’, ‘Property Type’, ‘Price Range’, ‘Property Location’, ‘Buy or Rent’ sections
Before we start anything I want to bring attention to the right sidebar. It contains 5 groups of category types, or what WordPress calls «Taxonomies». They’re ways to organize your Property Listings. These 5 taxonomies are custom made for this theme by yours truly. And they are 100% OPTIONAL. They are used ONLY if you want to browse listings by Features, Property Type, Price Range, Property Location, or Buy/Rent. The demo site has a «browse» item in the menu. When you hover over it, you can see that you can browse listings by these taxonomies. For now, to keep things simple, we will ignore these taxonomies. For more information about this, see the section called «Browse by…».
* Update: Starting from version 2.77, the Features taxonomy has another purpose. When you check off features for your listing, they will appear in the detail page under the heading «Features». They are bulleted and displayed in 3 columns. See the section called «Features» below for more information.
First Step
In the left column of wp-admin, click on the «Property Listings» header, then click «Add New Listing». You are brought to a Custom Post Type which is new in WP 3.0.
Title and body
Ok, now on to your first Property Listing post. First create your post «Title». This can be anything you want that will describe the listing. It could the the listing «address», or any other unique thing to describe the property.
Next, in the body of the post, enter all your descriptive text. It can be as long as you like. You don’t necessarily need to include the details like number of bedrooms, bathrooms, etc. because they will be entered separately later on. On the Listing page, all those details will appear in a list to the right of the images.
Adding features
The listing «detail» pages has an optional section right under the content area for showing a list of features:

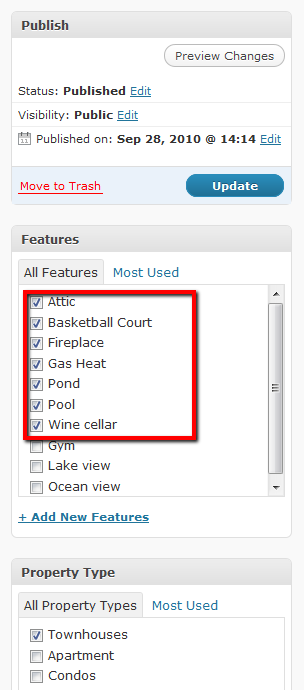
To add that section to the detail page, including all the property’s features, you check off the features on the right side of the post screen:

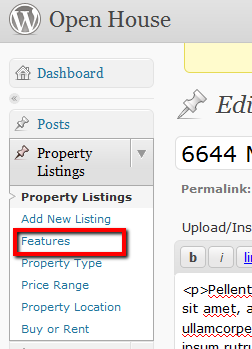
If you don’t have any features there yet, they are easy to add. Just click the «features» link on the left of the screen:

The minimum you need to do is add a feature name and then click the button on the bottom:

Adding images
You can add as many images as you like for the Property Listing. To add images, above the content section, click on the «upload/insert image» button. Upload all your images. After they upload, click on the «Save» button. You should be automatically moved into the «Gallery» tab. The Gallery tab shows you all the images that you uploaded for the current Listing. The top most image in the list will be the main image shown in the slideshow. You can click and drag the order of the images around. Make sure the representative image is on top. Click Save when you’re done, then EXIT the window by clicking the X on the top right. Don’t exit by clicking «Insert Gallery». If you do that, then all your uploaded images will be inserted into the post, which is NOT what you want. If you do this accidentally, no worries. Just go into the content area of the post and delete the Gallery text that was added.
You can return add, delete, and rearrange the vehicle’s images easily by clicking the «upload/insert image» button again. Remember, all your images associated with the current listing is in the «gallery» tab.
Adding video (optional)
Optionally you can add Youtube or Vimeo video to a listing. The theme will show a thumbnail of the video, and when clicked, it will open up in a lightbox and play. You can add as many videos as you like.
To add video, you need to enter the Youtube or Vimeo URL in the corresponding section. If you want to include multiple videos, enter each URL on a new line.
You also need to add an image that will show as the video’s thumbnail. This can be any image, including a video screen capture, or even just a photo. Enter the URL to the image in the «Video thumbnail image» section. If you have multiple videos, enter each image on a new line.
Entering listing location information
In the Address section, enter the exact listing address. This will be displayed throughout the site, and will also be used when generating the Google Map.
In the «City, State, Zip» section, enter the City, State, and Zip/postal code for the listing. This information will NOT be used for Searching, but it will be shown on the listing detail page. This text will be used as the main heading for property listings. It is also used, along with the «title» of the post, to automatically create the Google Map.
The next 2 settings, «Primary Search Location» and «Secondary Search Location» are very important because they are used when site visitors search the site by location.
Primary Search Location
Choose a location from the «Primary Search Location» dropdown list. This chosen location will be used when people «Search» for listings. The locations in this dropdown are defined in Appearance ->Theme Options. By default the theme comes with all 50 U.S. states. But if you’re a small company, you can edit that list and include just a few states, or even change it to «Counties», «Cities», or «Regions». Tailor it to your own needs. Don’t just leave it at States if you don’t need States.
Click here for details on customizing the Primary Search Location dropdown list.
Secondary Search Location
In the demo site, when you do a search, and you choose a Location «U.S. State», after a couple seconds, a secondary dropdown list appears with more specific locations. This is called the «Secondary Search Location», and is optional. You may want it if the first Location dropdown’s scope is too large. By default, and as demonstrated in the demo, when you choose a «State» from the first Location dropdown, a second dropdown appears with a list of State Counties. By all means, you can customize this to your needs. Feel free to change Counties to «Cities», «Towns», etc.
Click here for details on customizing the Secondary Search Location dropdown list.
If your Primary Search Locations are already specific enough, and you don’t want or need a Secondary Search Location, then you can disable it. To disable it, in Appearance -> Theme Options -> General, go to «Enable Secondary Search Location» and choose «Disable».
Click here for details on customizing the Primary Search Location and Secondary Search Location dropdown lists.
Google Maps Location
In most cases, you can leave this section blank. The theme will pull the map address from the combination of your post «title» (which should be the address) and the «City, State, and Zip» entry that you made.
But if for some reason, Google Maps can’t find the location, or it’s not listed in Google Maps, then in this section, you can manually enter a location.
Property Information
Most of these settings are self explanatory, but I will explain things that need more explanation.
Property Type
Choose a property type. The list of types is defined in Appearance ->Theme Options. This setting is used when site visitors search by Property Type.
Last Step…
Click on the Publish button!
Creating a news/blog post
Creating a regular news/blog/whatever post couldn’t be simpler. Simply add a new «Post». Type in a title and body text.
Setting a Featured Image
You can have a «Featured Image» for your posts. This image will show up as a small thumbnail or full width image depending on the page view. The image is added with WordPress’ «Featured Image» feature. Click «Set featured image», and the rest is self explanatory.
The last step is putting your post in the correct category. In the Categories section, put your post in your desired category (i.e. Blog, News, or even both!) Then click on the Publish button.